1. Connect Wi-Fi
※ If you have a LAN connection to the raspberry pie, you can skip this part.
An Internet connection is essential for updating packages, ssh, and sftp communications. Please enter the following command:
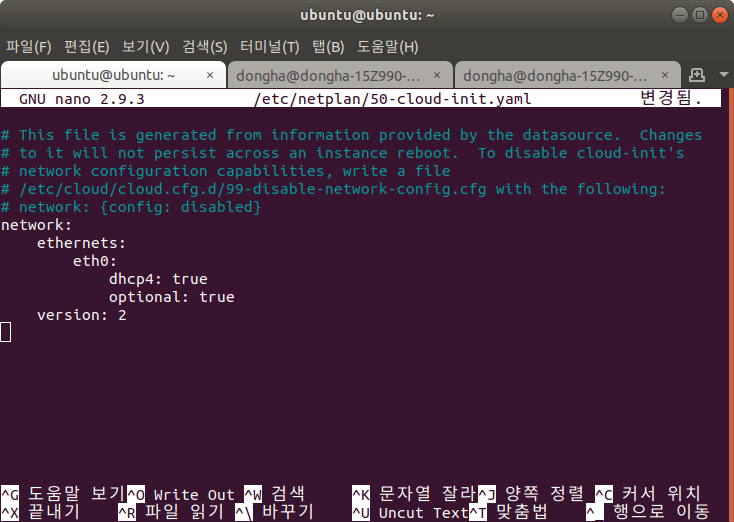
sudo nano /etc/netplan/50-cloud-init.yaml

========= Comment ==========
1. Open 50-cloud-init.yaml test file at /etc/netplan/ via 'nano' editor.
At first, the file will only have the above content. Please add below between 'ethernets' and 'version'.
wifis:
	wlan0:
		dhcp4: true
		optional: true
		access-points:
			"(Wi-Fi SSID)":
				password: "(Wi-Fi password)"
Then it will be as follows.
Ctrl+O to Save the file, and Ctrl+X to exit. And type the following commands:
sudo netplan apply
ifconfig

========== Comment ===========
1. Apply the edited file to the netplan service(= try to connect Wi-Fi).
2. display the Internet connection information.'eth0' means ethernet, 'wlan0' means Wi-Fi connection. Remember the IP address displayed at this.
2. Update the Ubuntu package
Hot to update the Ubuntu package in the case of Raspberry Pi is the same in the general case.
sudo apt update
sudo apt full-upgrade
sudo apt autoremove

========== Comment ==========
1. Update list of available packagies.
2. Update all packagies (including dependencies) available to be able to update.
3. Remove redundent packagies.
※ Note: apt full-upgrade = apt-get dist-upgrade
Because the Raspberry Pi's CPU is not as fast as a regular desktop or laptop, there are moments when the terminal appears to have stopped. If you want to know whether it is just too slow, or actually unresponsive, you can enter the following command:
top

========== 코드 설명 ==========
1. 작업 관리자 top을 실행한다.'top' is the same as the Task Manager in Windows. Active processes are displayed in bold letters, and CPU- and RAM-intensive processes are displayed at the top. If the CPU is working hard, it's simply taking a long time to work, and if the CPU is idle, it's in a non-responsive state.
At this time, %CPU do not display the share for the sum of all CPU cores, display that for each CPU cores.
When you install several packages, it takes a very long time because of compiling which displays cc1(C)과 cc1plus(C++) at the top.
3. Install ssh client
SSH is the protocol for a personal computer to handle the Raspberry Pi's terminal environment. It doesn't get the RP's display.
For SSH communication, You should install the SSH client at the PC, and the SSH server at the RP. Fortunately, The Ubuntu server includes the SSH server package.
If you are using Windows, you should install the SSH client privately. I recommend 'putty' for it. If you are using OS X or Linux(Ubuntu, etc.), you don't need to install the SSD client.
To connect to the Raspberry Pi, you first need to figure out the IP address to which the Raspberry Pi is connected. Use the IP address you checked earlier, but there is a condition.
If your IP is in
10.0.0.0 ~ 10.255.255.255
172.16.0.0 ~ 172.31.255.255
192.168.0.0 ~ 192.168.255.255,
→ You must connect the PC and the RP to the same network.
Open the terminal and enter the following command:
ssh ubuntu@(The IP address of the Raspberry Pi)

========== Comment ==========
1. Connect to ubuntu account in the (The IP address of the Raspberry Pi) via ssh.Then enter the password for Raspberry Pi's ubuntu account. If the terminal does not display any text, or display 'Permission Denied', it is because of one of the following three reasons.
1. SSH server process is off.
2. The Raspberry Pi is off or is not responsive.
3. Port 22 is blocked by the firewall.
1. To check whether the SSH server is on, enter the following command:
service --status-all

========== Comment ==========
1. List all running services and their status.If you found '[ + ] ssh', it means the SSH server is on. If it does not exist, start it through the following command:
sudo service ssh start

========== Comment ==========
1. Start the SSH service.
2. You can reboot the Raspberry PI via the following command:
sudo reboot

========== Comment ==========
1. Restart the computer.
3. Ubuntu includes 'iptables', the firewall, and 'ufw', the wizard for iptables. Enter the following command to allow port 22:
sudo ufw allow 22

========== Comment ==========
1. Allow access via port 22 (tcp/udp).
4. Use the STFP
Now, you can handle the Raspberry Pi without a monitor being connected to the RP.
The next we are learn how to transfer files to the Raspberry Pi without USB drive.
I recommend Filezilla for the SFTP client.
Filezilla is available on filezilla-project.org/download.php?type=client(WIndows, OS X, Linux supported).
Download FileZilla Client for Windows (64bit)
Download FileZilla Client for Windows (64bit) The latest stable version of FileZilla Client is 3.51.0 Please select the file appropriate for your platform below. Please select your edition of FileZilla Client FileZilla FileZilla with manual FileZilla Pro S
filezilla-project.org
Click the setting icon at the left upper corner.
Then enter Raspberry PI's IP address at the host (you should comply with the restriction!), 22 at the port, SFTP at the Protocol, general at logon type.
Click OK, and you should see directories in the right box. If not, restart the FIlezilla first. If also not, follow the three troubleshooting above.
I will explain how to build the taginfo using SSH and FTP.
'오픈스트리트맵(OpenStreetMap) > 오픈스트리트맵' 카테고리의 다른 글
| Make my own Taginfo instance - (3) Clone the project from Github (0) | 2020.11.26 |
|---|---|
| 나만의 Taginfo 구축하기 - (3) Github에서 파일 가져오기 및 설정 (0) | 2020.11.26 |
| 나만의 Taginfo 구축하기 - (2) Wi-Fi 연결, 패키지 업데이트, ssh, sftp 연결 (1) | 2020.11.24 |
| Make my own Taginfo instance - (1) Installing Ubuntu on the Raspberry Pi 4 (0) | 2020.11.22 |
| 나만의 Taginfo 구축하기 - (1) 라즈베리 파이 4에 우분투 18.04 서버 설치 (0) | 2020.11.22 |